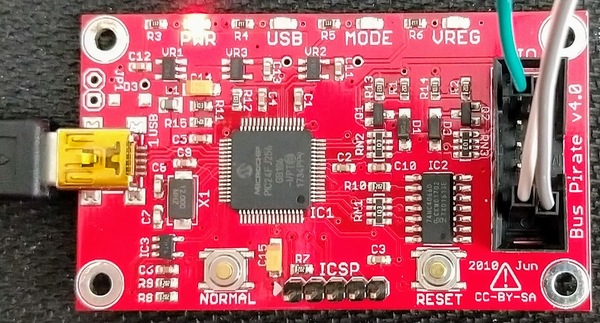
The Bus Pirate is a
cheap way to talk to I2C (and a lot of other serial protocol) devices
from your laptop. I use it to bring up new boards -- making sure
everything works before they get integrated into a bigger platform.
Specifically, I've been using the Bus Pirate version 4
(BPv4)
shown below.
Dangerous Prototypes has built
the Bus Pirate's API into the hardware with its binary
bitbang
firmware mode. This is great, since it means you don't need a
separate piece of software running on your laptop to run the API --
you can use whatever scripting language you want.
Connecting to the BPv4 is just like connecting to any other USB CDC
(ACM) device. The
version 3 Bus Pirate has an FTDI device to handle the communication,
while the BPv4 moves the USB stack into a Microchip PIC. You'll have
the usual first-time problems: Windows wants an INF file, and Ubuntu
wants your user to be in the same group as the device node. I linked
the INF file I used below.
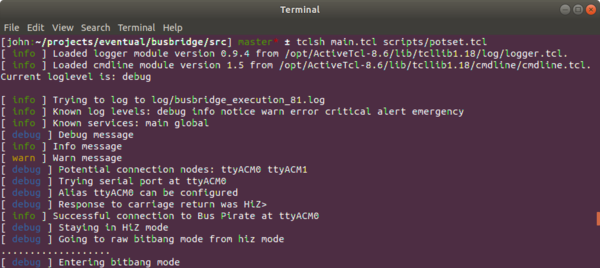
Once those basics are in place, the details of communicating over the
channel are determined by your choice of scripting language. I use
Tcl for things like this, so I need to use commands like chan
configure. The debug log
shown below shows the script doing a brute-force search of all
connected devices.
I'll go into what this potset script is later. For right now,
notice that the script identified two potential device nodes:
ttyACM0 and ttyACM1. The script will connect with the first
device that reponds to a carriage return with HiZ>. The
busbridge repository shows
how I did things. The BPv4 actually has an eeprom that could be used
to "tag" different Bus Pirates if you wanted to work with more than
one at once.
Going forward
The next step is to activate the BPv4's API to set up SPI or I2C
communication. I'll talk about that later.
The input file is simply Tcl, and is sourced by the main program.
Starting the program with no inputs will create an example.tbi
file in an input directory. This is just some basic organization
-- the program doesn't care about the input file location or its extension.
The seconds_per_inch variable controls how large timeslices will be
relative to their labels. If your timeslice labels don't fit, try
reducing this number.
Creating timeslices
The timeslice::timeslice function creates a timeslice. For example:
set mario_airborne [timeslice::timeslice 100e-3 red "Mario has jumped"]
...creates a 100ms-long red timeslice with a label. Recognized colors
are black, blue, green, cyan, red, magenta, yellow, and
white.
Creating reference lines (timestamps)
The timeslice::reference function creates a reference line. For
example:
set mario_lands [timeslice::reference "Mario lands on goomba"]
...creates a reference line with a label. The program will assign a
timestamp to the reference line depending on where it lands in its
timeline.
Creating timelines
The timeline::timeline function assembles lists of timeslices into a
timeline. For example:
set mario_list [list $mario_airborne $mario_lands $mario_recovers]
set mario_timeline [timeline::timeline "Mario" $mario_list]
...creates the mario_timeline timeline. Notice that the
mario_lands reference line is in the list of timeslices along with
regular timeslices.
Processing the input file
I have a history of creating Tcl software used by manufacturing
technicians. These people usually use Windows machines, and they like
being able to choose which version they can run. My executables thus
have their version numbers in their filenames. Use the -h option to
see the usage:
~/projects/eventual/timebars/starpacks $ ./timebars-1.0.2-win32-ix86.exe -h
timebars usage: timebars [options] filename
 -d value             Minimum depth <50>
 -o value             Output file name <timebars.fig>
 --                   Forcibly stop option processing
 -help                Print this message
 -?                   Print this message
If you don't specify an input file (call the script with no
arguemnts), the script will generate an input directory and an
example file in that directory.
The "minimum depth" parameter is for Xfig. If you already have
graphics drawn in Xfig and you want to add this figure, you'll need to
make sure the depths cooperate to make overlapping elements visible.
I needed to add an array of 0603 LEDs to a loudspeaker drawing (shown below).
Since I've done some scripting for xfig
files before, I thought I'd try that again.
You can see the tiny green LEDs distributed over the big middle
driver. You can find the
script here. You'll
need Tcl and Tcl's cmdline package to run it. Once you've got
things set up, you can see the usage with
~/p/eventual/scripts/boxarc λ tclsh boxarc.tcl -h
boxarc usage: boxarc [options]
-l value             Box length (mils) <100>
-w value             Box width (mils) <100>
-d value             Minimum depth <50>
-r value             Arc radius (mils) <1000>
-s value             Start angle (degrees) <0>
-e value             End angle (degrees) <90>
-n value             Number of boxes <10>
-o value             Output file name <none>
--                   Forcibly stop option processing
-help                Print this message
-?                   Print this message
...and you can get the LEDs shown in the above image with
...which puts 32 0.063 x 0.031 inch boxes on a 2.5 inch radius between
angles 30 and 150 degrees. The depth setting of 10 puts the LEDs "on
top" and visible in the image.
Xfig is still a very convenient tool for
me, and I need it to work under Cygwin. I've tried to document how
I've been able to get it to work. You will, of course, need to start
by installing Cygwin.
Download setup-x86.exe
Download the 32-bit (or 64-bit if you're feeling lucky) setup.exe from
cygwin.com. I like to copy it to
my Windows desktop so I can easily run it again when I need to add
packages. The 64-bit version seemed to be missing a few packages the
last time I tried it, and I haven't tried it since then.
Run the installer
Select install from internet. The default installation directory
(C:\cygwin) works for me. I also like to store package information
to C:\cygstore, but this isn't important. After selecting file
locations, you can use the
mirror sites page to find a local
mirror.
Choose these packages for installation:
xorg-server
xinit
xfig
xfig-lib
ghostscript
ghostscript-fonts-other
ghostscript-fonts-std
...and then Cygwin will decide which dependencies will also need to be
installed. The initial installation takes me about 15 minutes.
Start the Cygwin Terminal
This creates your home directory and some useful configuration files.
Start the X server
Starting the X server with
export DISPLAY=:0
startxwin &
...will let you keep using the same terminal after the server starts.
I've had some strange problems with this sequence of commands -- it
works for me on a host OS, but it failed at first on a VirtualBox
Windows 7 guest. The fix was to start the XWin Server via the start
menu instead of the command line. After I did that, the command line
started working. Maybe a config file got written? Anyway, now X is
running.
Start xfig to see the problem
I've got xfig 3.2 patchlevel 5c. I add some text to the canvas, then
zoom in. The error message is:
Font size 17 not found, using smaller 12 point
...and the glyphs don't scale with the rest of the canvas -- extremely
annoying.
Install some font tools
I needed to install the:
xset
mkfontdir
mkfontscale
...packages via the cygwin installer.
Download ghostscript fonts
I'm not sure where the fonts should be archived, but the file you want
is ghostscript-fonts-std-8.11.tar.gz. It looks like it's hosted
at SourceForge. I make the directory ~/fonts and unpack the file
there. This will make its own fonts directory. Descend into this
directory and:
mkfontdir
mkfontscale
Add this new fonts directory to the list known by X
With the X server running,
xset fp+ ~/fonts/fonts
...and you won't see any output.
Test the fix
Fire up xfig again and type some text. Enjoy the nice scaling glyphs
when you change the zoom factor!
You'll probably want to add the export DISPLAY=:0 line to your
.bash_profile or your .bashrc file. Unfortunately, the xset
command won't work until X is actually running. You could add that
line to your .bashrc, but you'd have to make sure you started
X via the start menu before you started the Cygwin Terminal. You
could also simply type bash after starting X to re-run the .bashrc
commands. And there are probably many better ways of doing all this.
Update on 2021-Jan-20 — Cygwin's X server issues
I stopped using Cygwin's X server because it wasn't working well with my high resolution display. Xfig's buttons and popups were too tiny to be usable. The VcXsrv server does a much better job, but my xset command stopped working. I saw the error messages:
xset:  bad font path element (#97), possible causes are:
    Directory does not exist or has wrong permissions
    Directory missing fonts.dir
    Incorrect font server address or syntax
The fix was to replace the Cygwin file path with a Windows path:
xset fp+ "c:/cygwin64/home/me/fonts/fonts"
...where c:/cygwin64/home/me is my home directory.
...and that's success! Of course, you can make your life easier by
adding the PATH command to your .bashrc or .bash_profile script.
Edit on Saturday, September 24, 2016
I could not install ActiveTcl in a way that allowed an ordinary
user to use teacup. I tried installing everything into
/home/john/opt instead of /opt, but teacup then created a
~/.teapot directory owned by root. So I guess users of "locked
down" systems will need to find another way to get the packages they
need.
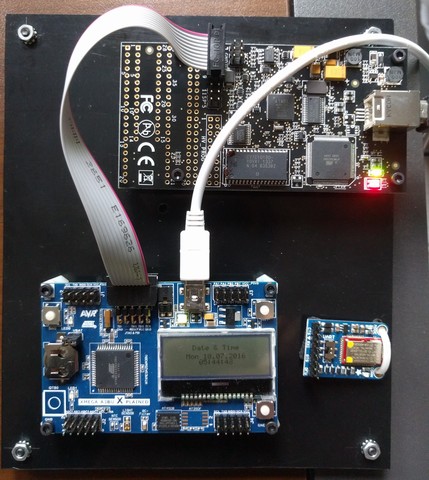
I was initially excited to use my new JTAGICE3 programmer with my
XMEGA board, but I couldn't get it to work with avrdude on Linux. I
don't want to switch to Windows just for this project, so I hooked up
the AVR Dragon as shown below.
Upgrade the Dragon's firmware
My original AVR Dragon had firmware that didn't support XMEGA
programming. Updating this required booting into Windows and starting
Atmel Studio. I ended up upgrading the firmware to version 7.39.
Set some udev rules
Linux Mint puts my user in the plugdev group -- not the dialout
group. But udev seems to want to put everything in the dialout
group, and it somehow isn't enough to just add my user to that group.
In the end, I wrote some udev rules to support the Dragon, the Common
Device Class Abstract Control Model (CDC-ACM) protocol, and the Atmel
bootloader protocol:
# Support the AVR Dragon
ATTR{idVendor}=="03eb", ATTRS{idProduct}=="2107", MODE="660", GROUP="plugdev"

# Support the CDC virtual COM port provided by the demo application
ATTRS{product}=="CDC Virtual Com", SYMLINK+="xmega", GROUP="plugdev"

# The stock bootloader shows up as idVendor 0x03eb, idProduct 0x2fe2
ATTR{idVendor}=="03eb", ATTRS{idProduct}=="2fe2", MODE="660", GROUP="plugdev"
Get the bootloader image
Some Google searches for the original bootloader image eventually let me to
this page,
and this link for the Xmega
bootloader images.
Flash the image with avrdude
avrdude -p atxmega256a3bu -c dragon_jtag -P usb -e -U flash:w:atmel_bootloader/binary/atxmega256a3bu_104.hex

avrdude: AVR device initialized and ready to accept instructions

Reading | ################################################## | 100% 0.02s

avrdude: Device signature = 0x1e9843
avrdude: erasing chip
avrdude: reading input file "atmel_bootloader/binary/atxmega256a3bu_104.hex"
avrdude: input file atmel_bootloader/binary/atxmega256a3bu_104.hex auto detected as Intel Hex
avrdude: writing flash (267770 bytes):

Writing | ################################################## | 100% 0.00s

avrdude: 267770 bytes of flash written
avrdude: verifying flash memory against atmel_bootloader/binary/atxmega256a3bu_104.hex:
avrdude: load data flash data from input file atmel_bootloader/binary/atxmega256a3bu_104.hex:
avrdude: input file atmel_bootloader/binary/atxmega256a3bu_104.hex auto detected as Intel Hex
avrdude: input file atmel_bootloader/binary/atxmega256a3bu_104.hex contains 267770 bytes
avrdude: reading on-chip flash data:

Reading | ################################################## | 100% 0.00s

avrdude: verifying ...
avrdude: 267770 bytes of flash verified

avrdude done.  Thank you.
...and you're welcome.
Boot into the bootloader with the magic button
Remove the JTAG cable, remove the USB cable, hold down the SW0 button,
then plug in the USB cable. You'll now be in the bootloader.
Test it -- load the XMEGA A3BU demo
You can download the XMEGA demo
here.
You can flash the image using the
dfu-programmer utility:
dfu-programmer atxmega256a3bu flash sample_hexes/XMEGA_A3BU_XPLAINED_DEMO1.hex
Validating...
35062 bytes used (13.81%)
...and you'll need one final power cycle to boot into the application
code when dfu-programmer finishes.
Check out the grinloader project for more details
My grinloader project has a
makefile that automates the steps I just described. It also archives
the bootloader hexes and the demo application.
The venerable xfig is still a nice vector
drawing program with a clean user interface. Using
ghostscript to convert its eps output to
png allows setting the conversion resolution explicitly. The script
below takes two arguments: the maximum dimension of the finished png
in pixels, and the input fig file.