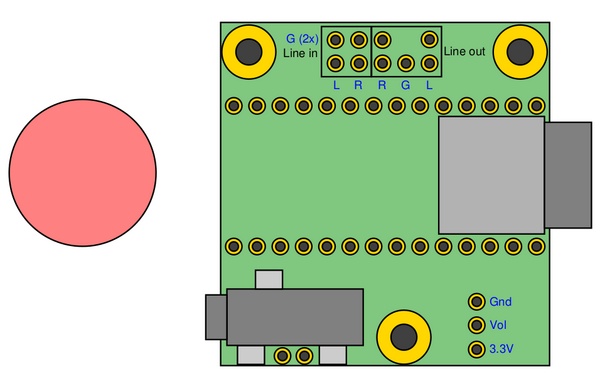
Xfig's depth settings can create some headaches when you use figure libraries. Library figures can use depths that conflict with your current drawing. Say I have this drawing of the Teensy Audio Board and a red circle,
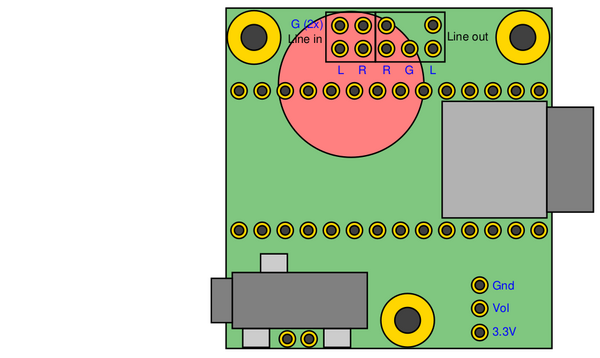
...and then I move the red circle over the board:
This is clearly not what I want. The circle has a depth of 50, and
the board has depths between 10 and 60. The circle ends up on top of
some objects and not others. If you were using PowerPoint, you would
just select Bring to Front or Send to Back to arrange the objects.
But Xfig requires setting the depth of each member object
individually, which you should really do with a script like
figdepth.
Using figdepth
Figdepth has some options, the most important of which is the minimum depth argument
...which sets the depth of the topmost object in a fig file. The
script simply increments all depths by some number to make this
minimum depth to be your setting. You will, of course, need to have
everything you want to modify in its own fig file. You can then run figdepth like
...to write your new depth-adjusted figure. Use Xfig's
merge command to
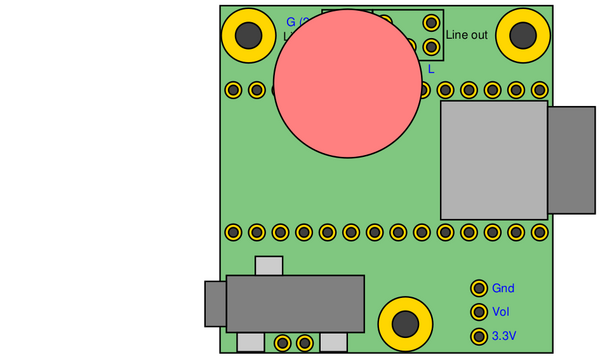
bring the new figure into your old drawing. My new drawing looks like this:
...with all objects in the Teensy Audio Board at a deeper depth than
the red circle.
How does it work?
The Fig file format is
really simple, which is one reason why I like Xfig so much. You can
figure out what kind of object each line describes by looking at the
first character. You then figure out which number in the line is the
object's depth and increment it. The switch statement below shows how
one line is processed.
proc increase_object_depth { xfig_line depth_increase} {
    # Return a new xfig line with the depth increased
    #
    # Arguments:
    #   xfig_line -- Single line from an xfig file
    #   depth_increase -- Amount to increase the depth
    set entry_list [split $xfig_line]
    set first_character [lindex $entry_list 0]
    switch $first_character {
    "0" {
        # Color object -- nothing to do
        return $xfig_line
    }
    "1" {
        # Ellipse
        set depth_index 6
        set old_depth [get_object_depth $xfig_line]
        set new_depth [expr $old_depth + $depth_increase]
        set new_entry_list [lset entry_list $depth_index $new_depth]
        set new_line [join $new_entry_list]
        return $new_line
    }
    "2" {
        # Polyline (also imported picture bounding boxes)
        set depth_index 6
        set old_depth [get_object_depth $xfig_line]
        set new_depth [expr $old_depth + $depth_increase]
        set new_entry_list [lset entry_list $depth_index $new_depth]
        set new_line [join $new_entry_list]
        return $new_line
    }
    "3" {
        # Spline
        set depth_index 6
        set old_depth [get_object_depth $xfig_line]
        set new_depth [expr $old_depth + $depth_increase]
        set new_entry_list [lset entry_list $depth_index $new_depth]
        set new_line [join $new_entry_list]
        return $new_line
    }
    "4" {
        # Text
        set depth_index 3
        set old_depth [get_object_depth $xfig_line]
        set new_depth [expr $old_depth + $depth_increase]
        set new_entry_list [lset entry_list $depth_index $new_depth]
        set new_line [join $new_entry_list]
        return $new_line
    }
    "5" {
        # Arc
        set depth_index 6
        set old_depth [get_object_depth $xfig_line]
        set new_depth [expr $old_depth + $depth_increase]
        set new_entry_list [lset entry_list $depth_index $new_depth]
        set new_line [join $new_entry_list]
        return $new_line
    }
    "6" {
        # Compound -- nothing to do
        return $xfig_line
    }
    default {
        # Some non-object -- nothing to do
        return $xfig_line
    }
  }
}
Having trouble with cmdline?
Figdepth
uses the
cmdline
package from
tcllib
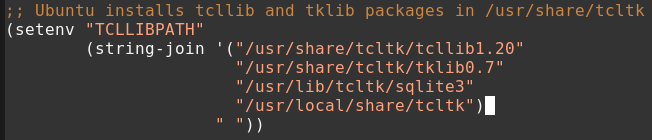
to handle command line arguments. I usually run scripts out of Eshell in Emacs, so I have this in my .emacs:
...to set the TCLLIBPATH environment variable. This tells Tcl where to find Tcllib's packages.
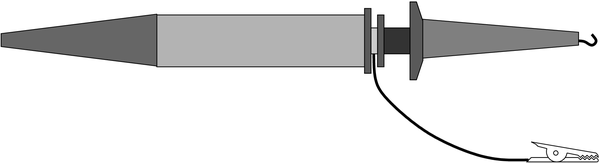
I still love Xfig when I need
to make a sketch of something with roughly-correct diminsions. I've
been neglecting my
Xfigart
repository, but I'm going to try to be better. I'll start with this
drawing of the
CES-571423-28PM
speaker from CUI.
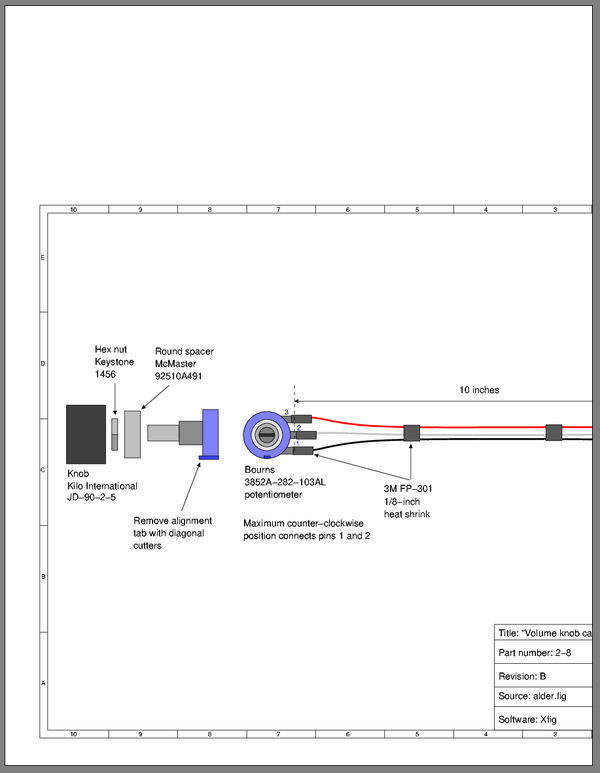
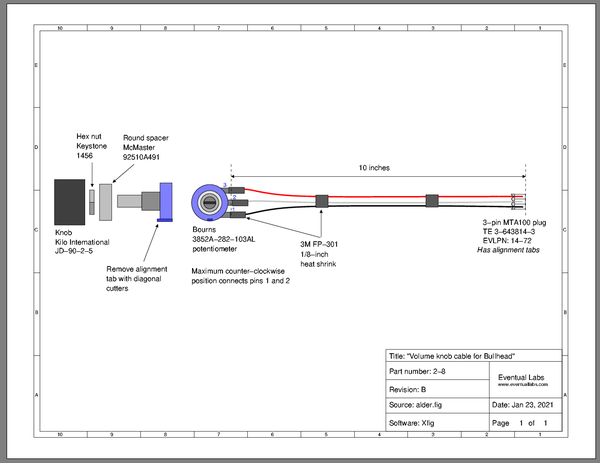
It's important to get the page orientation correct if you think your
Xfig output might ever be printed. I was trying to make a cable
drawing inside a titleblock with Xfig. The postscript output viewed
by qpdfview is shown below.
You can see that this will never print properly, and the ps2pdf
command simply gives you a pdf version of the same problem.
Ghostscript's ps2write device can fix the orientation with:
The input file is simply Tcl, and is sourced by the main program.
Starting the program with no inputs will create an example.tbi
file in an input directory. This is just some basic organization
-- the program doesn't care about the input file location or its extension.
The seconds_per_inch variable controls how large timeslices will be
relative to their labels. If your timeslice labels don't fit, try
reducing this number.
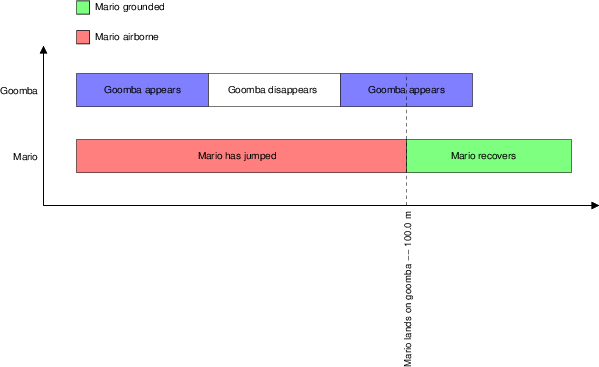
Creating timeslices
The timeslice::timeslice function creates a timeslice. For example:
set mario_airborne [timeslice::timeslice 100e-3 red "Mario has jumped"]
...creates a 100ms-long red timeslice with a label. Recognized colors
are black, blue, green, cyan, red, magenta, yellow, and
white.
Creating reference lines (timestamps)
The timeslice::reference function creates a reference line. For
example:
set mario_lands [timeslice::reference "Mario lands on goomba"]
...creates a reference line with a label. The program will assign a
timestamp to the reference line depending on where it lands in its
timeline.
Creating timelines
The timeline::timeline function assembles lists of timeslices into a
timeline. For example:
set mario_list [list $mario_airborne $mario_lands $mario_recovers]
set mario_timeline [timeline::timeline "Mario" $mario_list]
...creates the mario_timeline timeline. Notice that the
mario_lands reference line is in the list of timeslices along with
regular timeslices.
Processing the input file
I have a history of creating Tcl software used by manufacturing
technicians. These people usually use Windows machines, and they like
being able to choose which version they can run. My executables thus
have their version numbers in their filenames. Use the -h option to
see the usage:
~/projects/eventual/timebars/starpacks $ ./timebars-1.0.2-win32-ix86.exe -h
timebars usage: timebars [options] filename
 -d value             Minimum depth <50>
 -o value             Output file name <timebars.fig>
 --                   Forcibly stop option processing
 -help                Print this message
 -?                   Print this message
If you don't specify an input file (call the script with no
arguemnts), the script will generate an input directory and an
example file in that directory.
The "minimum depth" parameter is for Xfig. If you already have
graphics drawn in Xfig and you want to add this figure, you'll need to
make sure the depths cooperate to make overlapping elements visible.
I needed to add an array of 0603 LEDs to a loudspeaker drawing (shown below).
Since I've done some scripting for xfig
files before, I thought I'd try that again.
You can see the tiny green LEDs distributed over the big middle
driver. You can find the
script here. You'll
need Tcl and Tcl's cmdline package to run it. Once you've got
things set up, you can see the usage with
~/p/eventual/scripts/boxarc λ tclsh boxarc.tcl -h
boxarc usage: boxarc [options]
-l value             Box length (mils) <100>
-w value             Box width (mils) <100>
-d value             Minimum depth <50>
-r value             Arc radius (mils) <1000>
-s value             Start angle (degrees) <0>
-e value             End angle (degrees) <90>
-n value             Number of boxes <10>
-o value             Output file name <none>
--                   Forcibly stop option processing
-help                Print this message
-?                   Print this message
...and you can get the LEDs shown in the above image with
...which puts 32 0.063 x 0.031 inch boxes on a 2.5 inch radius between
angles 30 and 150 degrees. The depth setting of 10 puts the LEDs "on
top" and visible in the image.
Xfig is still a very convenient tool for
me, and I need it to work under Cygwin. I've tried to document how
I've been able to get it to work. You will, of course, need to start
by installing Cygwin.
Download setup-x86.exe
Download the 32-bit (or 64-bit if you're feeling lucky) setup.exe from
cygwin.com. I like to copy it to
my Windows desktop so I can easily run it again when I need to add
packages. The 64-bit version seemed to be missing a few packages the
last time I tried it, and I haven't tried it since then.
Run the installer
Select install from internet. The default installation directory
(C:\cygwin) works for me. I also like to store package information
to C:\cygstore, but this isn't important. After selecting file
locations, you can use the
mirror sites page to find a local
mirror.
Choose these packages for installation:
xorg-server
xinit
xfig
xfig-lib
ghostscript
ghostscript-fonts-other
ghostscript-fonts-std
...and then Cygwin will decide which dependencies will also need to be
installed. The initial installation takes me about 15 minutes.
Start the Cygwin Terminal
This creates your home directory and some useful configuration files.
Start the X server
Starting the X server with
export DISPLAY=:0
startxwin &
...will let you keep using the same terminal after the server starts.
I've had some strange problems with this sequence of commands -- it
works for me on a host OS, but it failed at first on a VirtualBox
Windows 7 guest. The fix was to start the XWin Server via the start
menu instead of the command line. After I did that, the command line
started working. Maybe a config file got written? Anyway, now X is
running.
Start xfig to see the problem
I've got xfig 3.2 patchlevel 5c. I add some text to the canvas, then
zoom in. The error message is:
Font size 17 not found, using smaller 12 point
...and the glyphs don't scale with the rest of the canvas -- extremely
annoying.
Install some font tools
I needed to install the:
xset
mkfontdir
mkfontscale
...packages via the cygwin installer.
Download ghostscript fonts
I'm not sure where the fonts should be archived, but the file you want
is ghostscript-fonts-std-8.11.tar.gz. It looks like it's hosted
at SourceForge. I make the directory ~/fonts and unpack the file
there. This will make its own fonts directory. Descend into this
directory and:
mkfontdir
mkfontscale
Add this new fonts directory to the list known by X
With the X server running,
xset fp+ ~/fonts/fonts
...and you won't see any output.
Test the fix
Fire up xfig again and type some text. Enjoy the nice scaling glyphs
when you change the zoom factor!
You'll probably want to add the export DISPLAY=:0 line to your
.bash_profile or your .bashrc file. Unfortunately, the xset
command won't work until X is actually running. You could add that
line to your .bashrc, but you'd have to make sure you started
X via the start menu before you started the Cygwin Terminal. You
could also simply type bash after starting X to re-run the .bashrc
commands. And there are probably many better ways of doing all this.
Update on 2021-Jan-20 — Cygwin's X server issues
I stopped using Cygwin's X server because it wasn't working well with my high resolution display. Xfig's buttons and popups were too tiny to be usable. The VcXsrv server does a much better job, but my xset command stopped working. I saw the error messages:
xset:  bad font path element (#97), possible causes are:
    Directory does not exist or has wrong permissions
    Directory missing fonts.dir
    Incorrect font server address or syntax
The fix was to replace the Cygwin file path with a Windows path:
xset fp+ "c:/cygwin64/home/me/fonts/fonts"
...where c:/cygwin64/home/me is my home directory.
The venerable xfig is still a nice vector
drawing program with a clean user interface. Using
ghostscript to convert its eps output to
png allows setting the conversion resolution explicitly. The script
below takes two arguments: the maximum dimension of the finished png
in pixels, and the input fig file.