Use avrdude and the AVR Dragon to restore the bootloader on the XMEGA-A3BU Xplained board
Use the AVR Dragon -- not the JTAGICE3 on Linux
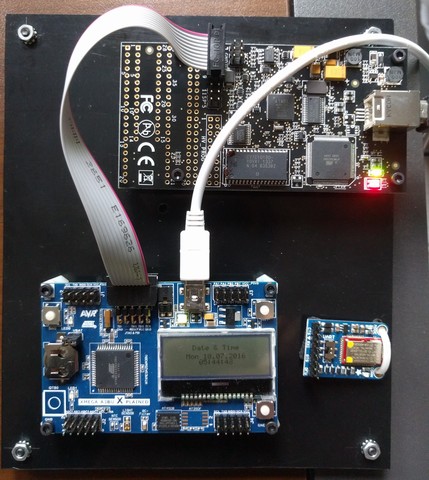
I was initially excited to use my new JTAGICE3 programmer with my XMEGA board, but I couldn't get it to work with avrdude on Linux. I don't want to switch to Windows just for this project, so I hooked up the AVR Dragon as shown below.
Upgrade the Dragon's firmware
My original AVR Dragon had firmware that didn't support XMEGA programming. Updating this required booting into Windows and starting Atmel Studio. I ended up upgrading the firmware to version 7.39.
Set some udev rules
Linux Mint puts my user in the plugdev group -- not the dialout group. But udev seems to want to put everything in the dialout group, and it somehow isn't enough to just add my user to that group. In the end, I wrote some udev rules to support the Dragon, the Common Device Class Abstract Control Model (CDC-ACM) protocol, and the Atmel bootloader protocol:
# Support the AVR Dragon
ATTR{idVendor}=="03eb", ATTRS{idProduct}=="2107", MODE="660", GROUP="plugdev"

# Support the CDC virtual COM port provided by the demo application
ATTRS{product}=="CDC Virtual Com", SYMLINK+="xmega", GROUP="plugdev"

# The stock bootloader shows up as idVendor 0x03eb, idProduct 0x2fe2
ATTR{idVendor}=="03eb", ATTRS{idProduct}=="2fe2", MODE="660", GROUP="plugdev"
Get the bootloader image
Some Google searches for the original bootloader image eventually let me to this page, and this link for the Xmega bootloader images.
Flash the image with avrdude
avrdude -p atxmega256a3bu -c dragon_jtag -P usb -e -U flash:w:atmel_bootloader/binary/atxmega256a3bu_104.hex

avrdude: AVR device initialized and ready to accept instructions

Reading | ################################################## | 100% 0.02s

avrdude: Device signature = 0x1e9843
avrdude: erasing chip
avrdude: reading input file "atmel_bootloader/binary/atxmega256a3bu_104.hex"
avrdude: input file atmel_bootloader/binary/atxmega256a3bu_104.hex auto detected as Intel Hex
avrdude: writing flash (267770 bytes):

Writing | ################################################## | 100% 0.00s

avrdude: 267770 bytes of flash written
avrdude: verifying flash memory against atmel_bootloader/binary/atxmega256a3bu_104.hex:
avrdude: load data flash data from input file atmel_bootloader/binary/atxmega256a3bu_104.hex:
avrdude: input file atmel_bootloader/binary/atxmega256a3bu_104.hex auto detected as Intel Hex
avrdude: input file atmel_bootloader/binary/atxmega256a3bu_104.hex contains 267770 bytes
avrdude: reading on-chip flash data:

Reading | ################################################## | 100% 0.00s

avrdude: verifying ...
avrdude: 267770 bytes of flash verified

avrdude done.  Thank you.
...and you're welcome.
Boot into the bootloader with the magic button
Remove the JTAG cable, remove the USB cable, hold down the SW0 button, then plug in the USB cable. You'll now be in the bootloader.
Test it -- load the XMEGA A3BU demo
You can download the XMEGA demo here. You can flash the image using the dfu-programmer utility:
dfu-programmer atxmega256a3bu flash sample_hexes/XMEGA_A3BU_XPLAINED_DEMO1.hex
Validating...
35062 bytes used (13.81%)
...and you'll need one final power cycle to boot into the application code when dfu-programmer finishes.
Check out the grinloader project for more details
My grinloader project has a makefile that automates the steps I just described. It also archives the bootloader hexes and the demo application.